Introducing the next big thing in desserts — Dessert Bowls! A cross between a de-constructed cake and a trifle, it’s a dessert soiree and a new way to enjoy your favorite sweets!
Step aside, Buddha bowls. Goodbye, smoothie bowls. There’s a new bowl in town. Say hello to Dessert Bowls, every bit as beautiful and Instagram-able as the Instagram food trends of the past few years, but (in my humble, sweet-tooth-ruled opinion) so much tastier. Ok, so that’s a big statement and maybe a bit too bold, but I am so excited about these dessert bowls right now. They’re an idea that I’d been toying with for a while after seeing my first smoothie bowl on Instagram… it was beautiful and I instantly wanted to recreate it… until I realized that it was mostly healthy fruit. Don’t get me wrong, I enjoy a good smoothie, but imagine my disappointment when what I thought was a bowl of strawberry mousse and sprinkles turned out to be strawberry almond milk and chia seeds 💔. Maybe I have a problem, I know my sweet tooth is strong, but, as a result, I can now share with you these dessert bowls (which, you may have noticed, also contain fruit, so there’s that).
Let’s break down these Dessert Bowls and everything you need to know about how to make them.
What is a Dessert Bowl?
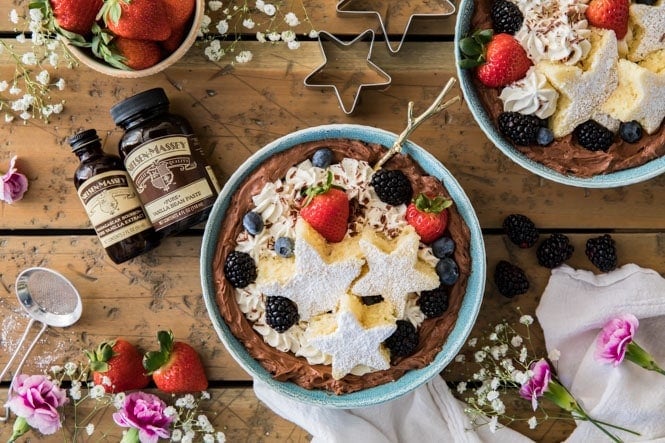
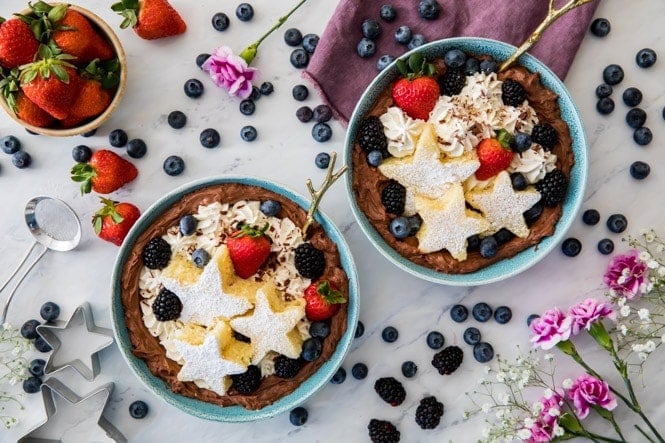
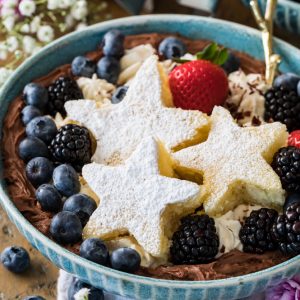
It’s a new way to enjoy dessert. Mine are made with a bottom layer of rich, chocolate cream cheese mousse, cut-outs of vanilla bean cake, a homemade vanilla bourbon whipped cream, and plenty of fresh berries. It’s a bit like a trifle, a bit like a de-constructed cake, and a bit irresistible. I think that you’ll find that each component of the dessert bowl plays nicely with the other. The chocolate cream cheese mousse is rich and dark while the whipped cream is soft and light, the cake is sweet and perfectly textured while the berries are slightly tart and refreshing.
What do I Need to Make Dessert Bowls?
Besides pretty bowls (and maybe some impractical, but very pretty, gold-plated twig-shaped silverware) there are a few things I recommend.
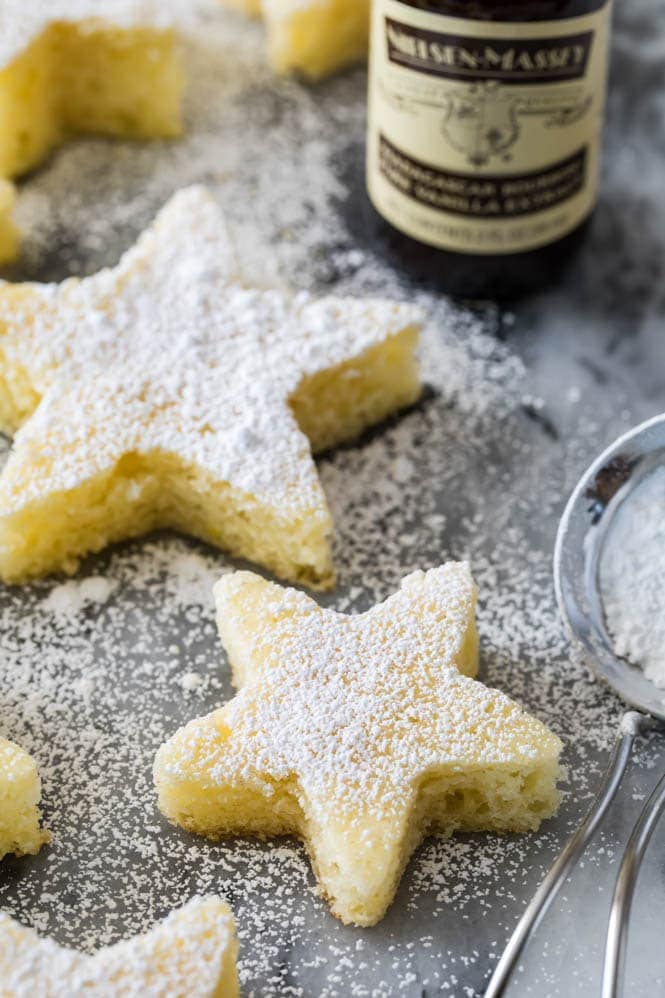
Star-shaped or heart-shaped cookie cutters (or your preferred shape!). If you don’t have cookie cutters you can just cut the cake into squares, but I really like the effect that the cut-out shapes have on the presentation! Your favorite fruit — I used blueberries, blackberries, and strawberries, but raspberries or cherries would also work very well! I was tempted to try pomegranate seeds, they would be both beautiful and delicious, too! Quality ingredients — particularly vanilla extract. There is a reason I teamed up with Nielsen-Massey for this post — Nielsen-Massey understands that vanilla is its best when the natural essence is allowed to shine, and so I highly recommend using their Madagascar Bourbon Pure Vanilla Extract and Pure Vanilla Bean Paste throughout this recipe as indicated. Nielsen-Massey keeps its ingredient list short and sweet when producing their pure vanilla, so you’re getting true vanilla flavor that will really shine through in your baked goods. All of their vanilla beans are hand-examined and they use a proprietary cold extraction process (instead of heat extraction) to preserve all of the 300+ distinctive flavor compounds present in vanilla beans for a rich, complex flavor profile. And finally, a smart phone to take a picture and share it to Instagram. It’s what all the cool kids are doing these days, right? (I’m mostly kidding about Instagram but if you do snap a pic, please do tag me @sugarspun_sam so I can see your creation!)
TIPS FOR MAKING DESSERT BOWLS:
I recommend making the vanilla cake portion first as it will need to cool before you can cut it and use it in your dessert bowls. If you try to cut the cake before it is cooled it may fall apart, and if you try to add the powdered sugar while the cake is still warm it will just melt. Each component of the dessert bowls can be made in advance — the cake and chocolate mousse can be made 1-2 days in advance. The vanilla bean whipped cream that I’m using here is based off of my whipped cream recipe, which I have successfully stored for days, but just to be on the safe side I recommend making it the same day you intend to serve. While the dessert bowl components can be made in advance, I recommend keeping them separate and assembling the dessert bowls just before serving. This recipe will make 4 dessert bowls the size of the ones shown in the photos. Just a fair warning — that’s a lot of dessert and is best if you want to split with one or two friends. To serve more people individually, just use smaller bowls.
Alright, I think we’ve covered all the bases of what I believe is going to be one of the biggest food trends of 2018 😉 I hope you’ll try them out, and be sure to follow Nielsen-Massey on Facebook, Twitter, and Instagram for more recipe ideas! Enjoy!
How to Make Dessert Bowls
Shop the Post: [show_shopthepost_widget id=”3034796″] This post contains affiliate links, which means that if you purchase anything through these links I will get a small commission at no extra cost to you. Please view the disclosure policy for more information.