Italian Fried Rice Balls
Arancini, aka Sicilian fried rice balls, are a quintessential Italian street food. If you’ve never had them, you’re in for a treat! The outside is golden-crisp, and the interior is soft with pearly risotto and a melty mozzarella core. Serve them with a side of marinara sauce for that classic flavor! These rice balls are super versatile and adaptable; you can dress things up by adding some garlic in with the onion, or add ham or peas to the filling (you can even skip the mozzarella). I like this more basic but super flavorful version, though.
Why You’ll Love This Recipe
Crispy, even coating from my proven breading technique borrowed from my mozzarella sticks, coconut shrimp, and jalapeno poppers. Can be made with leftover risotto or fresh. I include instructions for making fresh risotto if that’s what you’d prefer, or you can use 3 ¾ cups of leftover risotto. Customizable filling options; I like using cheese, but feel free to add peas, ham, or use meat sauce! Tastes great plain, but is even better with a dipping sauce of marinara, vodka sauce, or arrabiata sauce (if you like it spicy!).
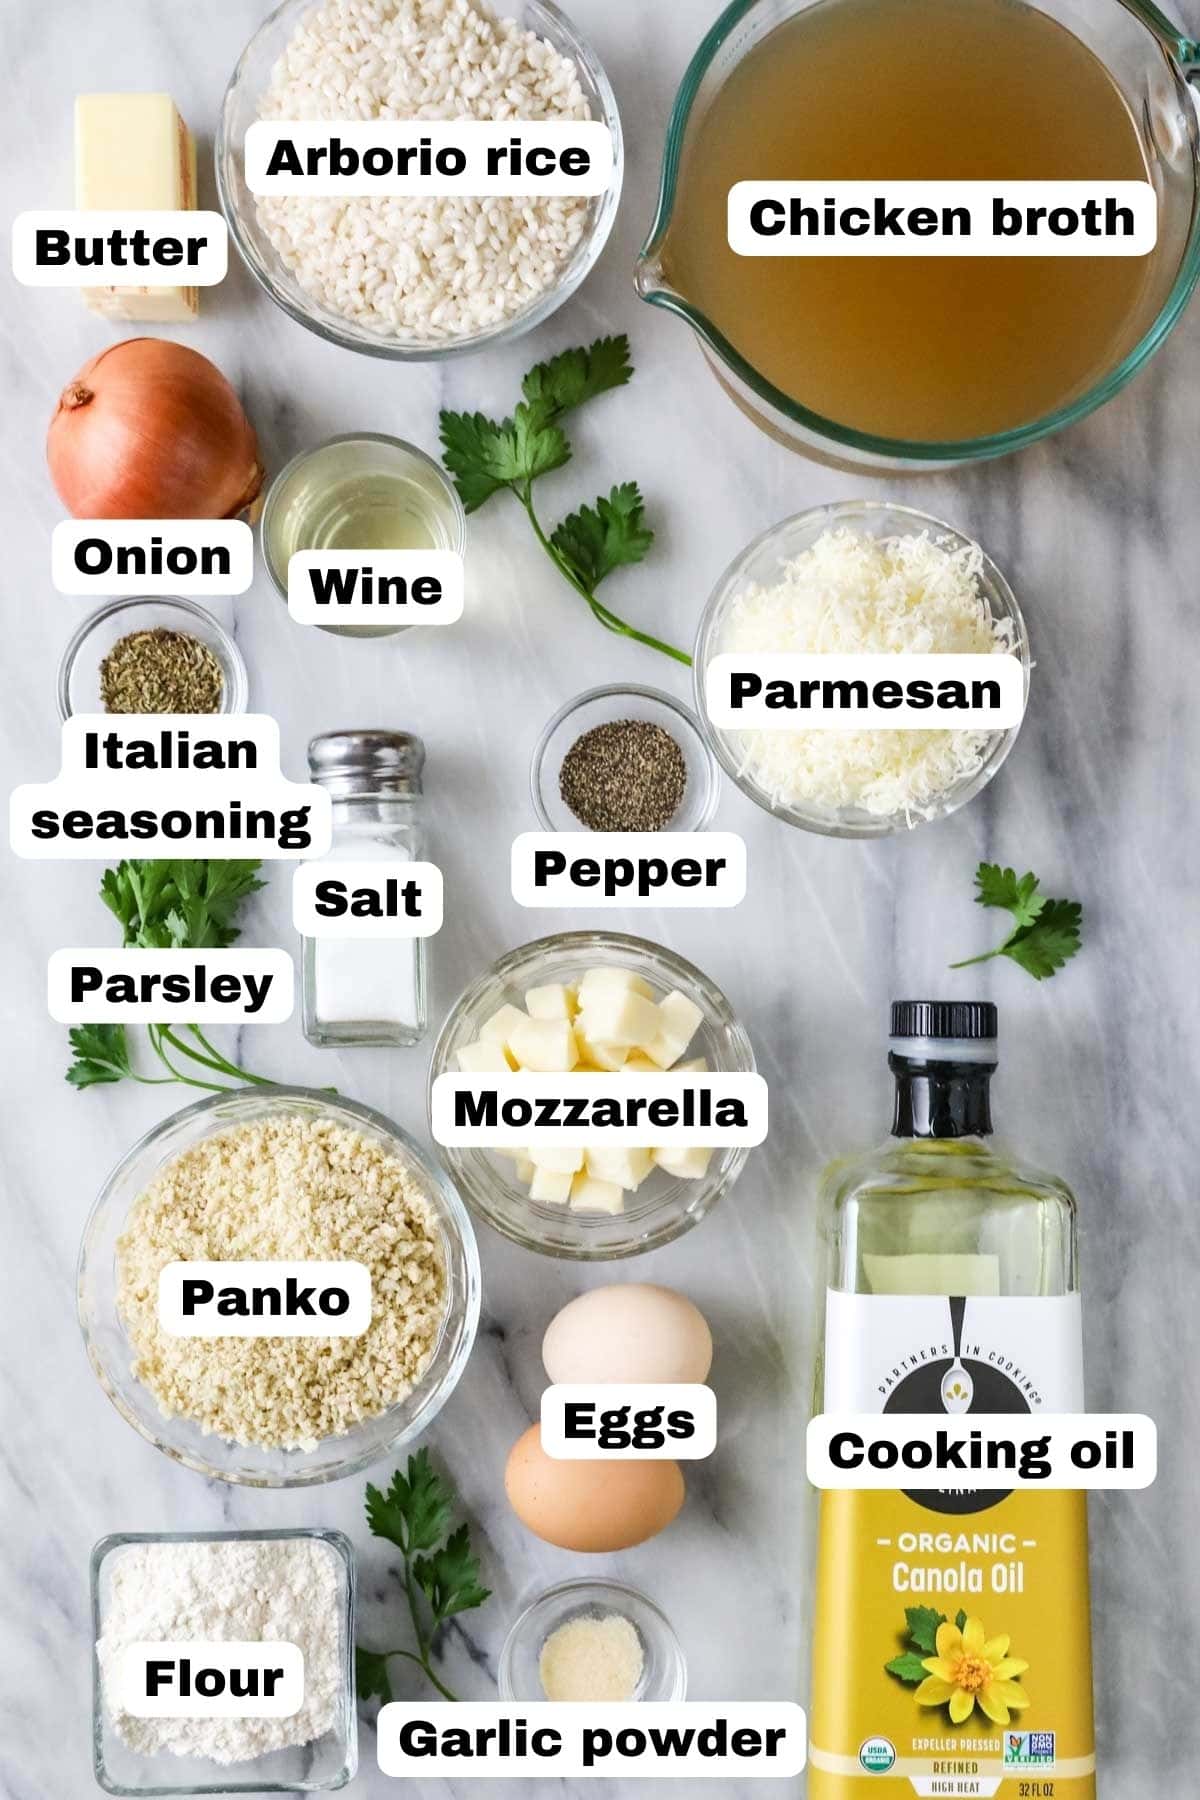
Ingredients
Let’s review a few of the key ingredients in this recipe before we get started.
Arborio rice. Arborio rice is the best choice (and the best choice when making risotto), as it is starchy and will help our arancini keep their shape. Carnaroli rice could be used instead, but most likely arborio will be most accessible at your grocery store. Cheese. We’ll use parmesan cheese in the risotto itself and mozzarella as our filling. Make sure your parmesan is freshly shredded (do it yourself!) and use a block of mozzarella for the filling (not the fresh mozzarella that comes in a ball, that can be much too wet). The mozzarella will need to be diced so that the rice can be neatly rolled around it. White wine. A bit of wine is used to flavor the risotto, though you could substitute more broth or chicken stock if you don’t keep wine on hand. If using wine, choose a dry white wine like Pinot Grigio. Plain panko. We flavor this ourselves with a simple blend of seasoning and cheese (though you could use Italian panko in a pinch). This serves as our breading and ensures a perfectly crispy exterior on our arancini. Note that we won’t be using this straight from the container; I like to crush the panko into fine crumbs first. This is my secret for an even, crisp coating! Oil. Use a good oil for frying, like vegetable oil or canola oil. Avocado oil should also work (it’s just quite expensive!).
This is just an overview of the ingredients I used and why. For the full recipe please scroll down to the bottom of the post!
How to Make Arancini
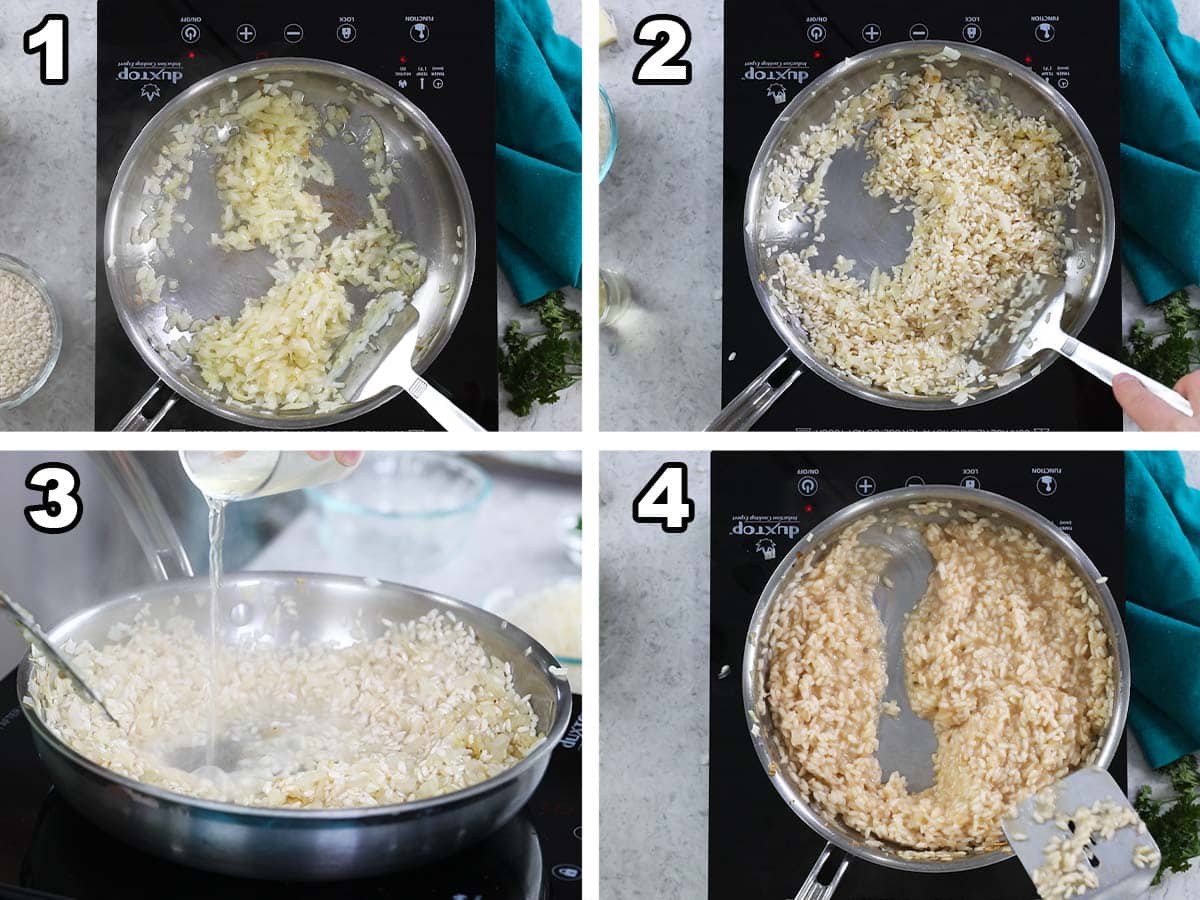
Prepare the Risotto
If you’re using leftover risotto you can of course skip this step (and I even already have a step-by-step guide in my standalone risotto recipe), but I thought it would be helpful to walk through the whole process, rather than just skip to the breading and frying! Before you begin, pour your chicken broth into a saucepan and warm it over low heat. To cook the risotto, you’ll be adding broth throughout the process and you want it to be warm, otherwise it can cause the cooking time to take much longer and could make the rice end up mushy.
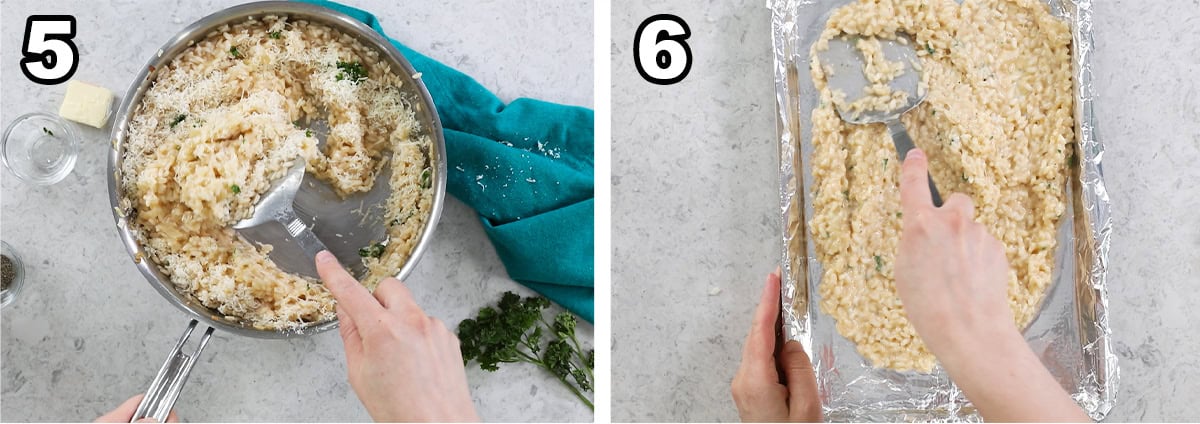
Finish & Cool the Risotto
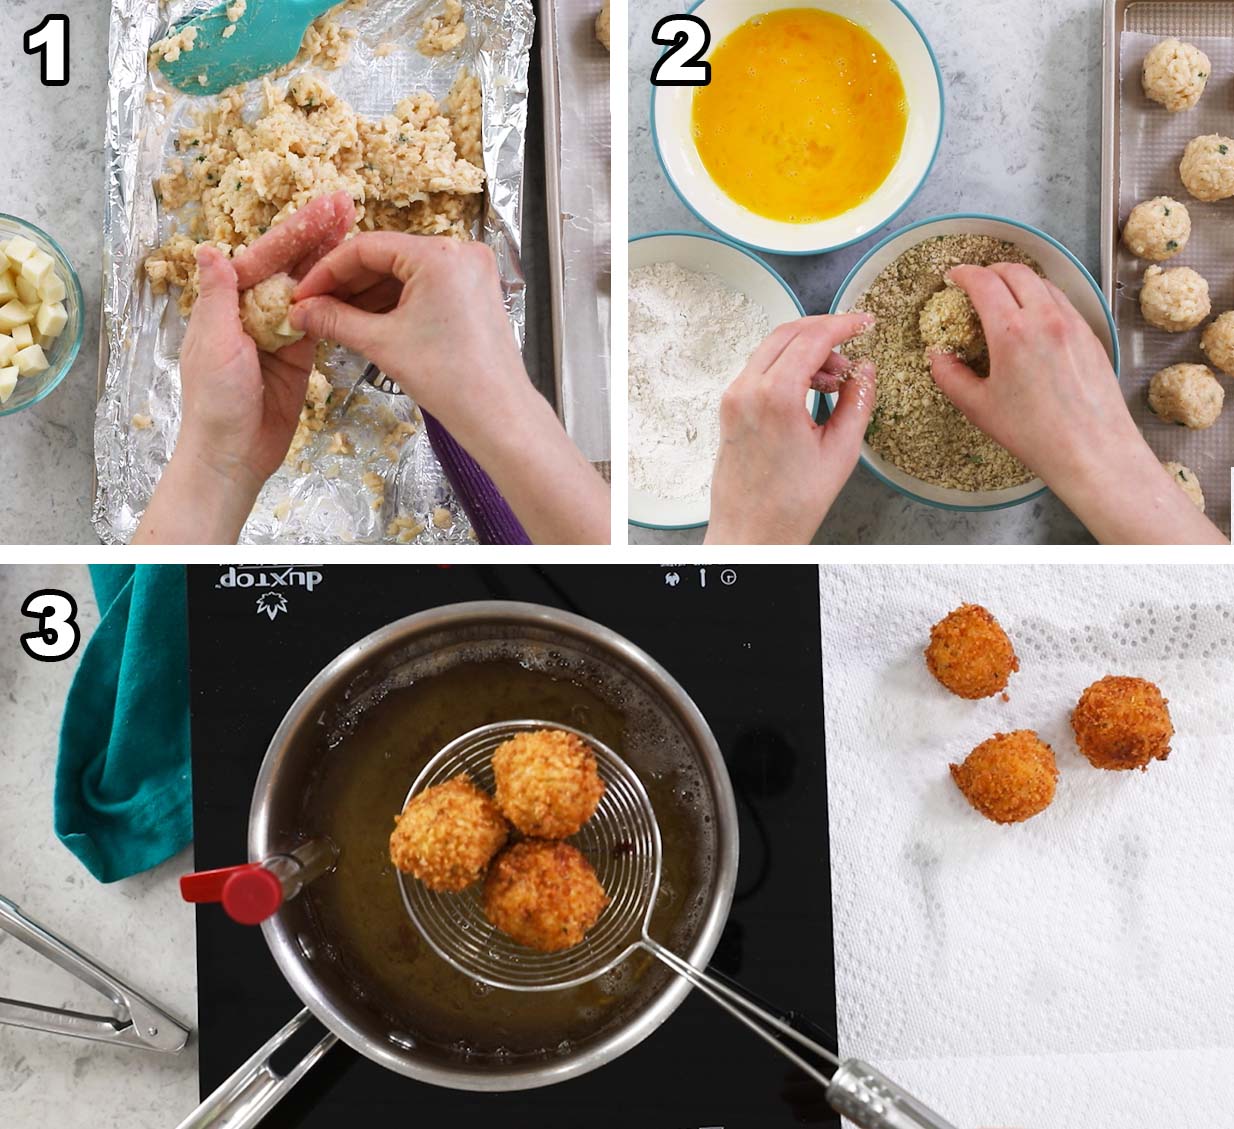
Assemble & Fry
SAM’S TIP: Take care to place the mozzarella in the very center of the arancini. If it’s exposed or too near the edge, it could spill out while frying (a tragedy!).
Tips for Frying
Set up your station ahead of time. I like to have a rimmed cookie sheet topped with a cooling rack and paper towel beside me so I can let the arancini drain after frying. Heat slowly and use a thermometer. I keep my stovetop just below medium heat. Any higher and I find it becomes too hot too quickly and burns the outside. Keep your arancini in the fridge until the oil is hot. This helps them hold their shape so they don’t fall apart when you add them to the hot oil. Fry just 2-3 arancini at a time. Adding too many at once can drop your oil temperature and create soggy arancini. Let the oil come back to temperature after frying each batch, as it generally tends to cool as it cooks the arancini. Adding the next batch too soon can cause soggy, inconsistent results.
SAM’S TIP: A cookie scoop is ideal for getting uniform arancini that cook at the same rate. Of course, you could make yours smaller (or bigger!) if you want. Arancini make a great appetizer for baked ziti or fettuccine alfredo! Or, you can simply enjoy them for dinner with a side salad–I won’t judge! Enjoy! Let’s bake together! Subscribe to my newsletter to be notified of all the newest recipes, and find my free recipe tutorials on YouTube 💜
Related Recipes